


In the modern construction world, Scan to BIM Modeling has emerged as a game-changer, whether it’s a retrofit project or a renovation project. By creating digital models of actual physical spaces, architects and engineers can plan a construction project in great detail.
However, a 3D model is only useful if it is accurate. A digital model is just a 3D drawing if it does not match the real building, which could lead to expensive mistakes during construction. That’s why, to check the accuracy of scan to BIM models, Quality Assurance (QA) is done.
In this article, we explain the step-by-step process for Quality Assurance (QA) in scan to BIM.
What Exactly is Quality Assurance (QA) in Scan to BIM?
Quality Assurance is a systematic process that helps us verify that the final 3D model of our construction project is accurate enough to build the desired, successful project. In Scan to BIM modeling services, quality assurance is not just a final check. Rather, it is a series of steps taken from the moment the laser hits the wall to the moment the final Revit file is delivered.
The role of quality assurance is to identify and resolve all the discrepancies on the computer so they don’t come as surprises in front of us on the construction site.
The 3 Main Pillars of Quality Assurance

To understand how quality is maintained in Scan to BIM projects, we look at three specific areas:
Data Accuracy
Data Accuracy starts at the point cloud to BIM process. This means that we need to make sure that the data we have collected for our BIM model is “clean”. If it is not, then “noise” is removed from the models. This noise can be anything that should not be included in the model, like people or cars moving through the scan. This makes sure the different scan positions align perfectly to make a clean model.
Modeling Integrity
Once the data is clean, the scan to BIM conversion services team starts modeling. Through quality assurance, we can verify that every wall, pipe, and beam is placed exactly where the scan data shows it should be.
Standards Compliance
Every scan to BIM project has certain rules, which are generally called the Level of Detail (LOD). Through QA, you make sure the model meets all the requirements and adheres to the client’s naming conventions.
Learn how to enhance accuracy and teamwork in your projects with our blog LOD in BIM Service: Reducing Errors and Improving Collaboration.
Quality Assurance Process in Scan to BIM
A trusted scan to BIM services provider follows certain steps of quality assurance to create an accurate scan to BIM model. The following process includes the steps of how a high-quality model is built:
Step 1: Point Cloud Validation
Before starting the modeling process, experts check for errors in the BIM point cloud. If the original scans are misaligned or tilted by even a few millimeters, it means that the entire 3D model is wrong.
Step 2: Modeling Alignment
In this stage, the 3D model is aligned and overlaid onto the point cloud scan to BIM data. This allows the team to see and confirm whether the digital walls are perfectly “hugging” the points captured by the laser.
Step 3: Utilize QA Tools & Technologies
Specialized software is used to automatically check the modern 3D scanning BIM projects. These tools can scan thousands of elements within seconds to find those parts of the model that don’t align with the original, accurate data.
Step 4: Automated Clash Detection
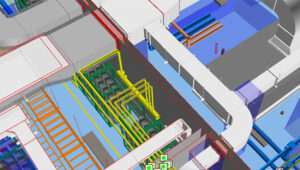
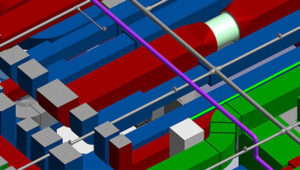
In this critical step, special software like Navisworks is used by the team to find and resolve “Clashes”. Clashes arise when two components come in each other’s way, when they are not supposed to. For example, electric wiring should not go through the plumbing system.
Step 5: Regular Reviews & Feedback
Quality assurance is not just done by software; it is also reviewed by humans. Senior BIM managers conduct regular internal reviews to provide their feedback to modelers. In this way, they can catch small human errors before they grow into big problems.
Stage 6: Documentation & Reporting
In a transparent process, clients also deserve detailed quality reports. The client gets peace of mind after knowing how everything was checked and how the errors were resolved.
Stage 7: Final Verification & Audit
To finalise the QA process, a final audit is performed. This step makes sure the scan to the BIM Revit file is clean, organized and ready to be used by the construction team.
Stage 8: Continuous Improvement
After the project is completed, teams analyse what went well. This helps them to improve the workflow for the upcoming projects, to make their process faster and more accurate.
Discover the advantages of reality capture in our blog What is Scan to BIM? Benefits Explained and how it enhances modern design workflows.

Common Mistakes Found During Quality Assurance
While creating a scan to BIM model, even the best teams can get stuck on issues. These common errors are later found and resolved during QA. Here are some of these common errors found in QA:
Misaligned Scans: If the scan positions are slightly off, then two rooms or components don’t ‘connect’ properly in the digital space.
Over-modeling or Under-modeling: Mistakes of over-modeling arise when the modeler adds too many details that were not requested. And under-modeling arises when the modeler misses small but important details, such as pipes.
“Ghost” Objects: Ghost objects are those objects that are not solid, but they appear so in the scan. For example, reflection from windows or mirrors.
For a detailed breakdown of precision standards, read our blog How Much Accuracy Should You Expect from Scan to BIM Models? to understand what level of accuracy is realistic for your project.
Why SmartCADD is Your Trusted Partner for Scan to BIM Quality
When you are looking for the best laser scan to bim services, SmartCADD comes out as an industry leader. We don’t just deliver models; we deliver accuracy. SmartCADD offers complete scan to BIM solutions that focus on precision and client satisfaction.
Here are some of our best qualities:
Multi-Level Verification
At SmartCADD, our verification process goes through multiple steps. Every person who creates the model checks it, and then it is also verified by a separate Quality Lead.
Advanced Tools
We always use the best technology for scan to BIM Revit modeling. With high-end hardware and software, our team quickly processes massive point clouds without losing any detail.
Clash Detection Expertise
In the Quality Assurance process, our team of experts identifies hidden clashes and resolves design issues during the digital phase, saving you thousands of dollars in on-site work.
Customized Solutions
SmartCADD understands that every building is unique in many ways. Whether the project is a highly detailed MEP model or just a simple architectural shell, we provide tailored solutions that meet your specific project requirements and budget.
Conclusion
Quality Assurance plays an extremely important role in the success of a scan to BIM project. The system is capable of converting unprocessed, raw data into a reliable tool that contractors and architects use with confidence. By following a strict validation, alignment and reporting process, you ensure your project stays on schedule and within budget.


